We are a web and mobile design, development, and digital marketing agency. Request a Quote
Photography is an art, it is always advisable that you must read your Camera Manual and learn the basic of functions that your camera manufacturer has offered you. Leaving everything on auto mode will not give you best result. If you want to take pride on your work then you must be ready to do experiment.

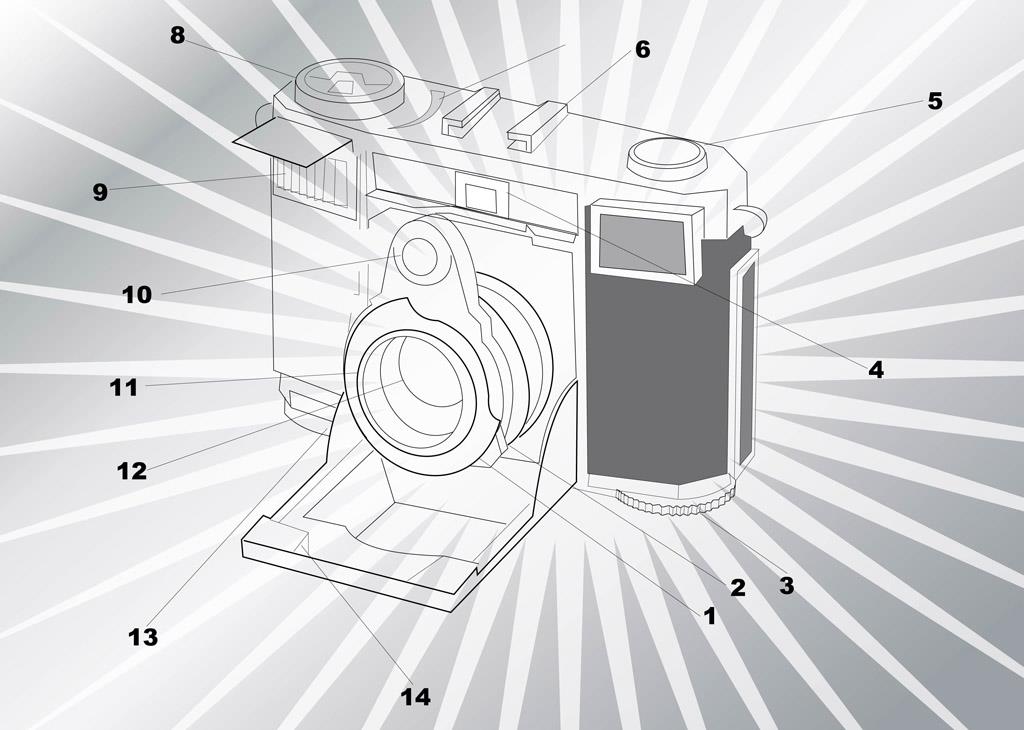
50 Basic tips to handle Camera
Camera Basics
1. Learn how to Handle your Camera:
It might sound really obvious, but how you handle your camera, and how and when you press the shutter button is really important. Every camera is different when it comes to handling. There’s no absolute right or wrong way to hold a camera, but how still you hold it when you take the photo is very important.
2. Get to Know your Menus:
Probably the most important of our top 50 photography tips is to read your Camera Manual and make sure you understand the many options and settings on offer. You won’t get the best results by leaving everything on auto. Be prepared to experiment if you want to take pride in your work.
3. Extend your Battery Life:
Digital cameras can be very power-hungry. If you don’t want to miss the shot of a lifetime, make very sure that you won’t run out of power in the middle of nowhere. Always carry at least one spare set of batteries with you, fully charged, and turn the LCD screen off when not using it.
4. Buy a Bigger Memory Card:
The key to getting great pictures is to take lots! Buy a large memory card so that you don’t need to worry about running out of space when you are in the field. In fact, buy two! Bigger memory cards will also allow you to shoot in RAW, which will give you the best opportunity to rescue shots with potential in post-production.
5. Give your Camera some Support:
Ask any professional photographer the best time to use a tripod, and they’ll say ‘always’. Granted, using a tripod is not always practical or desirable, but look out for other camera supports that will help keep your camera steady when light levels drop and exposure times lengthen. Invest in a beanbag, or at the very least prop your camera against a wall, on a fence or against a pillar to get a steady shot.
6. Master Exposure Modes:
It’s very important that you learn when and how to use both the automatic and manual exposure modes that your camera has on offer. This will help you to tailor the camera’s settings to give optimal results in a wide range of shooting situations. Most cameras have scene modes that are specially designed for specific types of photography, such as landscapes, portraits, night shots, and sport shots. Using the right mode can greatly improve your photographs, as well as assist in avoiding the more common photographic pitfalls. As you gain experience, you may want to start experimenting with manual modes too. The ability to set the desired aperture and shutter speed is essential for more creative effects.
7. Understand Apertures:
The aperture of a camera acts like the iris of an eye. It can expand or contract to vary the amount of light that travels through the lens. Aperture settings are measured as ‘f-stops’, such as f/4, f/5.6 and f/22. The higher the f-stop number, the smaller the amount of light travelling through the aperture. As well as varying the amount of light, changing the aperture setting also changes the amount of the photograph that’s in focus. With a smaller aperture (such as f/22) just about the entire image is in focus. With a larger aperture (f5/6) the focus is shifted, so things in the foreground are in focus, while the background isn’t.
8. Consider your ISO Setting:
If in doubt, set your ISO setting to 100 or 200, whatever is the lowest ‘standard’ ISO setting.
9. Use the Manual White Balance:
Cameras vary, but auto white balance is generally designed to produce neutral results. It therefore removes some of the warmth that makes scenery so appealing – especially during the magic hours of dawn and dusk. You will have to experiment with your own camera, but try switching to the daylight setting when you’re shooting landscapes. It also pays to use the appropriate setting indoors.
10. Turn the Histogram On:
Most DSLR’s will show you a histogram on the LCD screen. Using it to check your exposure is fundamental to being a good photographer.
11. Learn when to use Flash:
On-camera flash has its uses (for example when your main subject is backlit or is in the shade), but it’s best not to leave decisions about the use of flash to the camera. You will get much more appealing photos if you turn the flash off when shooting portraits, and avoid red-eye to boot. Also never use flash when shooting through glass, shooting subjects more than 3m (10ft) away, photographing scenery at night, or in macro mode.
12. Take Sharper Photographs:
Most modern camera lenses are capable of producing pin-sharp images if you care to avoid camera shake. Shutter speed is important in this regard. Many professional photographers consider 1/125 a ‘safe’ speed for hand-held images, but when a longer focal length is used, or when the focusing distance is closer, 1/250 or 1/500 sec is a much safer bet.
13. Learn the Basics of Composition:
There are no hard and fast ‘rules’ to composition, but there are several tried and tested guidelines that can be helpful to get more pleasing pictures. For example, make sure that you fill the frame with the main subject, experiment with varying your viewpoint, and move the frame so that the subject is off-centre rather than in the middle. The more pictures you take, the better you will get – especially if you take the time to analyse your results and learn from your own mistakes.
14. Get in Closer:
You can have the perfect location and the perfect subject to photograph, but if it’s too far away, your photo will lack the wow-factor. It’s important to always ask yourself whether the composition is tight enough. If you look through your viewfinder and you don’t manage to fill the frame with what’s essential, use your feet to get closer or change lenses.
15. Consider the Background:
No matter how well your subject is lit or how nicely composed the image, the results will be disappointing if the background is not well chose. The best backgrounds are either neutral, or provides tonal and colour contrast. An area of deep shade, such as under a tree or in an open doorway can make an effective background, or if all else fails, use a long-focus lens and wide aperture to throw the background out of focus.
16. Be Selective:
Deciding what to leave out of a photograph can be as important as what to include. A large proportion of disappointing photographs are the result of including too many conflicting elements. Less is more, and greater impact can be achieved by isolating visual elements such as pattern, texture, shape, form and colour.
17. Identify a Focus of Interest:
Good composition includes the necessity to identify a point of interest in a scene, such as a lone tree on a hill, or even just a shadow, splash of colour or the shape of a cloud. Images work better when the viewer has something that draws the eye.
18. Use the Rule of Thirds:
The rule of thirds is one of the most powerful aids in composition. Imagine a grid over your photo, with a pair of lines dividing the scene vertically into three and another pair doing likewise horizontally. Now, place your principal subject at one of the intersections of the horizontal and vertical lines, and the horizon against one of the horizontal lines. If you place key elements at these points, your composition will be much more powerful.
19. Consider Viewpoint and Angles:
Point and shoot is the enemy of good photography. When shooting an image, consider viewpoint as one of the most important aspects of great composition. Move around the location and try different variations to get an interesting shot. This may mean lying down on your back or climbing a tree. Shooting from low down or high up gives a completely different perspective. Also try tilting the camera for an interesting outcome.
20. Look for Patterns:
Pattern can be used to produce images with a satisfying, balanced effect that the eye finds comforting and reassuring. A pattern is simply the repetition of a particular shape or detail. The impact of a pattern is usually heightened with the subject of a photograph has a limited colour range as the eye is forced to focus on the rhythm of the pattern only.
21. Take the Abstract Approach:
Close-up photography allows you to produce pictures that have an abstract quality and are not simply a record of an identifiable subject. Even the most familiar objects found around the home and garden can be photographed in original ways to produce intriguing and eye-catching images. All the focus needs to be on the shape, pattern, texture and colour, while creative use of lighting can also add an air of mystery.
22. Be Aware of the Quality of Light:
Learn to look at light and how it changes. It’s often the quality of light that makes the difference between a stunning photograph and a so-so one. No matter where you are in the world, the hour or so at the start and the end of the day offers the best light. The reason is how the sun produces a warm glow and long shadows to a scene.
23. Look for a Dominant Colour:
Some of the most striking pictures are those where one particular hue completely dominates the scene. This can be achieved by a careful choice of viewpoint, and framing the subject so that there are no distracting colours that will compete for the attention. The result can be even more dramatic if the other colours in the image are either quite subdued or create a contrast.
24. Use the Vertical Orientation:
Only a very small percentage of photographs are taken using the vertical orientation. The main reason is that most cameras are easier to hold in the horizontal position. A large proportion of photographs would be much more pleasingly composed if they were shot as uprights, so teach yourself to consider the upright option first, then move on to taking horizontal images.
25. Use a Natural Frame:
Images gain impact when they are given a natural border, for example the overhanging branches of a tree. You will need a small aperture to ensure adequate depth of field; that is, it usually works best when both the foreground and the background are in focus.
26. Get Creative with Long Exposures:
A long exposure can create magic by capturing a drawn-out period of time in a single frame. For example, long exposures are great for capturing moving water, such as waterfalls or when shooting fireworks. The key is to keep the camera perfectly still, so a tripod or other support is essential.
27. Try your Hand at Panning:
Panning is a professional effect that is used to preserve a feeling of motion or speed when photographing a moving subject. Panning involves using a fairly slow shutter speed (typically in the 1/5th to 1/50th range) while moving the camera to follow the motion of the subject you are shooting. The more accurately you follow the motion, the sharper the main (moving) subject will appear. Hand-held panning is usually a bit of a hit-and-miss affair, but the results can be striking even when there is a lot of blur in the frame. Try it at sport events or in wildlife photography. As in all things, practice makes perfect.
28. Judge the Contrast:
If the difference between the highlights and shadows are too great in a scene, the outcome will be a harsh and unattractive image. A key to producing good quality pictures is learning to avoid subjects that are lit in such a way that they will not record well. Viewing a potential subject through half-closed eyes can help you to judge the true depth of the shadows and the brightness of the highlights.
29. Play with Filters:
As you get more creative in your photography, you’ll probably want to experiment with different filters. Warm-up filters can greatly improve your images, but it’s best to experiment, as the colour and strength of filter needed depends on the colour quality of the light and the subject at any given time. A polarizing filter is one of the most useful to have in yoru camera bag as it eliminates some of the light reflected from non-metallic surfaces, such as foliage and water. It also makes blue skies richer and darker, and water appears more translucent – even on a dull day.
30. Choose Software with Care:
If you’re an enthusiast photographer and you want to produce professional quality results, you will need to use photo editing software to fine-tune your digital photography before printing. If you’re starting from scratch, there are a few main photo editing programs to choose from: Photoshop Elements, Photoshop and Paint Shop Pro is probably next in line. You may also want to look into Adobe’s Photoshop Lightroom, Apple’s Aperture, and Phase One’s Capture One.
31. Master a good Workflow:
If you’ve got images scattered across your hard drives and you struggle to find or even remember when you took that killer picture you need, you’ll soon lose your passion for photography. A tight and regimented workflow is essential to keep track of photos as they build up over the years. In an ideal world you should have one hard drive where you store all your RAW files, one hard drive for your edited work and a back-up drive. Get into the habit to import, name, edit and store your files on a consistent basis.
32. Know the Top 5 Tweaks:
No matter how brilliant your shot appears on the LCD screen, it will still need some form of editing – especially if you’ve shot in RAW. The top five tweaks are basic and essential qualities you should scrutinize when looking at your photos. You may not need to adjust them all, but it’s good practice to have all five in mind. Firstly, the horizon should be level for landscapes and the general crop either square or the same size as your sensor. There should be a pure black and white point somewhere in your image for maximum contrast, and the dynamic range of contrast should be tweaked to give a little more impact. For colour images, the saturation generally needs a boost, and a final sharpen will help your images zing.
33. Master Layers:
Layers are a vital part of digital darkroom work. They enable non-destructive editing of your photos, which leads to superior quality and smoother results as no pixel data is changed. Think of them as clear acetates stacked on top of the image applying whatever editing effect you want, with the option to adjust the content whenever you like. At the most basic level, Layers can be used to perform general adjustments like Levels, Curves and Hue/Saturation. As you get more confident with Layers and their awesome power for editing, blending and creating stunning HDR-style images, you’ll never go back to standard editing.
34. Explore HDR:
High Dynamic Range is a digital darkroom where two or more exposures are blended together to create an image that has a wide dynamic range, much more than would ever occur naturally in a photograph. There’s lots of software on the market that automatically makes HDR images from your photographs, but you can do it manually from RAW, which will also help you to understand the process better.
35. Try your Hand at Mono Conversions:
Everybody loves a great black and white image and getting into mono conversions is real easy.
36. Use Dodging and Burning: No serious image should ever be finished off without a little dodging and burning, especially with mono work. It will make your images stand out from the crowd and inject more atmosphere in the lighting. Dodging simply works by increasing the pixels’ light values and therefore making parts of the image brighter where Burning does the opposite, making pixels appear darker. Dodging and burning have their own separate tools and techniques to get the most impact and best quality from your pictures.
37. Don’t Overcook your Images:
We’ve all heard the saying that ‘less is more’ and this is especially true for the work you’re doing in the digital darkroom. Know when to stop editing an image. Tweak after tweak after tweak will ultimately destroy image quality – especially when printed.
38. Save your Files Correctly:
When you’ve finished an editing session you’ll need to save your file. There’s a difference between finishing off an image to output for printing or emailing, and saving a file for extra editing at a later date. Images that you want to return to should be saved in a file format that is lossless (preserves the image data no matter how many times it’s opened and saved again) and one that preserves the Adjustment Layers that you used to edit the image. The PSD or TIFF files are fine for this. For final outputting you’ll need to consider what you’ll be using the image for. Websites, print and email uses will all need saving as different file sizes and formats, such as JPEG. You may also have to resize your images. Take the time to do it right from the start and you’ll save yourself hours of frustration later on.
Sharing Photos
39. Create a Web Photo Album:
You don’t have to clog up family and friends’ inbox with emailed photos these days – just use a sharing service to create a web photo album and email them the link. There are an increasing number of websites that do all the work for you, and most of them also offer mail-order prints.
40. Connect to a TV for a Digital Slideslow:
It’s great to be able to view your photos immediately on the LCD screen of your camera, but it’s even better to see them enlarged on a TV screen. Use the relevant cable to connect your camera and television, sit back, and enjoy the digital slideslow.
41. Stage a Mini Exhibition:
Once you’ve amassed a number of photos that you are proud of, stage a mini photo exhibition at a local venue, such as a library, village hall or community centre. Restaurants, sports clubs and local photo shops might be receptive to an exhibition from local photographers too. Whatever your venue, make sure that you pick only the cream of your collection and give each a high quality frame that complements the subject. Provide captions for photos, including your contact details. You could also add a price to purchase on each print
Be the Best Photographer you can Be
42. Discover your Unique Voice:
To be the best photographer you can be, it’s important that you discover your own unique voice as a photographer. You don’t want to simply copy what thousands of other photographers do – you want to put your own spin on it, whether it’s doing something different in the field or in post-production. The starting point is to specialize in something you love. Do you love food? Photograph it. Do you have a special place in your heart for wild life? Focus on it in your photography. Do you like blurry abstracts, or photos that are crisp and in-focus? The more passionate you are about what you do, the more time and effort you will put into creating something truly special – and it will show in your work.
43. Look for Inspiration:
Look for photographs that inspire you taken by professional photographers. Get books from the local library and study photographs used in magazines and ads.
44. Anticipate the Moment:
Great photographs are often the result of perfect timing – a warm smile, a jump in the air, the kiss of a bride and groom. The trick to timing is to anticipate the moment and this takes a little practice.
45. Shoot a Theme:
If you lack inspiration, focus on a theme for a day, a week, or a month, and explore a subject in depth. It can be anything: a shape, colour or subject. The result will be a collection of photos that are all linked by a theme. This exercise will go a long way towards helping you hone your photographic skills and move beyond the obvious.
46. Learn to Read the Weather:
If you’re able to predict weather conditions and light, then you’re increasing your chances of getting a decent shot significantly. Don’t be afraid of bad weather – conditions such as fog, snow and rain can transform both town and countryside for wonderfully moody images.
47. Invest in a Variety of Lenses:
A good photographer can take great images with any lens, but for more adventurous photography, it’s a good idea to stretch the range as far as you can. Try some ultra wide-angle lenses and super telephotos and see what happens in your viewfinder – you’ll be pleasantly surprised.
In Conclusion
48. Keep it Simple:
If there’s a good general rule to follow in photography, it’s to keep it simple. An image that includes only the essential elements of a scene will invariably have more impact than a more complex picture. Always identify the things that appeal most strongly to you within the subject, and then eliminate as much distracting details as possible. It’s often best to take two or more photographs of a scene rather than trying to include everything in one shot.
49. Don’t Over-Critique your own Work:
To keep growing as a photographer, it’s important to analyse and critique your own photographs. However, always remember that perfectionism kills creativity. Photography is not supposed to be perfect (many of the most famous photos have technical imperfections), so don’t criticize yourself to a point where you stop enjoying what you do. There are tools that you can use to improve your photographs, but always remember that they are tools, not rules.
50. Take Photos Every Day:
If you really want to be the best photographer you can be and make the most of our Top 50 photography tips, take photos every single day. This is the best way to train your eye to see beauty everywhere you go and intuitively find the best angles to show each scene off at its best. Don’t take only one photo either… try do take at least one that’s as technically perfect as you can manage to get it, then break all the rules! Have fun in the process! In fact, having fun is the key to being good. Seriously.
Find more on… http://www.basic-photography-tips.com/